Monday, September 2, 2013

Django, Dajax, and Getting Dajax to work (Lite-Em-Up Component Organizer)

Django

After futzing around with all sorts of database application approaches, I finally settled with Django. Here's what I messed with:
  1. Pure sqlite implementation with python application for interface
  2. MS Access Database
  3. Finally, Django
The pure approach at the top is probably what I'd end up going for if I ever wanted to mass produce this, MS Access was painful and nearly useless (it was a dark time in my life). Django has offered the easiest database creation/ application development framework of all three. So it was very attractive for my "just get it done" state of mind. Not only that but most of the interface for working on the database contents has already been made for you (in the admin site). The only thing left for me was figuring out how I was going to use the nice interface to make a box light up... a button perhaps? A button that could run a python script. The tricky part is how do you wire up the button which is in a webpage that Django serves, to run your dead simple python script? And how do you pass the script the number of the box to light up?

The answer is of course, Dajax. Not only will dajax serve me well for this project, but also for all the other projects I have going at work to create database systems for control component management and planning.

Dajax

Starting from here, I was able to gather that this dajax thing was pretty powerful, and handy. But the example leaves a lot out. I tried going through the setup documentation, but it is also operating from the assumption that you pretty much know what you're doing... Not only that, but there are almost no very basic tutorials for the current (0.9 dajax, 1.5 django) releases. So that's what I am going to write here, somewhat for you, and mostly for me.

How to get a button on a django webpage to execute a python script using dajax:

This tutorial assumes that you already have Django 1.5 setup. I do not claim to be any sort of an expert, my training was in mechatronics and physics, so getting Django to work for me has been an exercise in hacking all the way. That being said, here we go!

Dajax Setup

First install dajax and dajaxice using pip.
 sudo pip install django_dajax  

Then follow these instructions to add dajaxice to your project (required!). Some points for clarification: the urls.py to add your dajaxice url to is for the site (not the app!). You probably could have figured that out, but just to save you some questioning.

Finished? Great! Now follow these instructions to install dajax. For clarification this is what I did for the jquery step ( I was confused because I thought you simply add this line to your head:
 {% static "/static/dajax/jquery.dajax.core.js" %}  
 but you need to embed it sensibly like so:
 <script type="text/javascript" src="{% static "/static/dajax/jquery.dajax.core.js" %}"></scrip>  
t>

Also make sure you load the staticfiles lib into the template (place this at the top of the template):
 {% load staticfiles %}  

The meat

Here's my template page all together:
 {% load dajaxice_templatetags %}  
 {% load staticfiles %}  
 <head>  
 <script type="text/javascript" src="{% static "/static/dajax/jquery.dajax.core.js" %}"></script>  
 <script type="text/javascript" src="{% static "/static/eci/jquery-2.0.3.js" %}"></script>  
 {% dajaxice_js_import %}  
 </head>  
 <button onclick="Dajaxice.eci.light_up_box(Dajax.process);">Show me where</button>  

A few things to note:

  • I downloaded the newest jquery from the jquery website here, and placed it in the app folder under static/eci/ where eci is the name of my django app.
  • The onclick call goes as Dajaxice.appname.function in the ajax.py.
Here's my ajax.py code which resides in my app folder (called eci in my case, for electronics component inventory):

 from dajax.core import Dajax  
 from dajaxice.decorators import dajaxice_register  
 import serial, time  
 @dajaxice_register  
 def light_up_box(req):  
   dajax = Dajax()  
   dajax.alert("Hello World!")  
   serial_port = serial.Serial('/dev/ttyUSB0', 9600, timeout=None)  
   box_number = 4  
   number = str(box_number)  
   if box_number <10:  
     number = '0'+number+'X'  
   else:  
     number = number+'X'  
   serial_port.write(number.strip())  
   serial_port.close()  
   return dajax.json()  

I use the dajax.alert function to confirm independently that the dajax function was called. I'll probably use it later to confirm that the box was found and the part removed (ask for a quantity or something).

That's the long and short of it. I hope it helps you. I was really sad when I couldn't find a basic tutorial that explained the stupid questions I had, hopefully you don't have the same problem!

Wrap up

So as of last night the electronics component organizer has been improved a bit. I have a larger current power supply connected, which will hopefully help with the power issues I've been having. I have also finally secured my pcbs and power supply to the top of the box so it's not so janky. Also, now that I have this dajax thing working I can finally start putting together the rest of the database viewing pages that will allow me to light up boxes at will.

Thoughts for the future:

I think I might have made a mistake trying to get my computer to stream the FFT data to the arduino over serial. I may end up making a new pcb that has an audio jack pass through so that the FFT can be done directly on the arduino. Once the basic database is done I'll probably go ahead and populate the organizer with parts. That will probably take a good part of a Saturday.

Thursday, May 16, 2013

Lite-It-Up Component Organizer.

So it's been a long time. Actually over a year since I last posted about this project. There has been progress. Unfortunately for the past several months it's kind of been on the backburner. Between working on my house, working at SLAC, and nailing down my rhythm I haven't had mad this project a high priority. Hopefully the blog post means that will change soon. Enough words, let's get down to what's happened.

Where we were

So I had just finished a quick test with some foil to see if the idea of painting the drawers would serve to turn them into an effective light tube. It worked. I had also bought the LEDs and the driver chips. I made a proto-board version of the backplane, and that sucked, so I knew I needed to find a better solution. Enter Halted Electronics.

The backplane and mounting

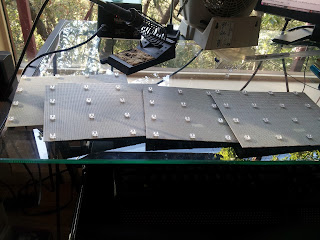
So I found this awesome proto-board at Halted that was basically tinned copper clad on one side, with predrilled holes in it (just like regular protoboard). I mapped out on the boards where the LEDs would sit and cut out some isolated areas on the board. I forget if the rest of the board was Vcc or Gnd... Then all I had to do was solder the LEDs, and the connector, and run wire back to the connector. The other LED legs were all on a common plane.


And, yes, it took a couple of weekends to do.

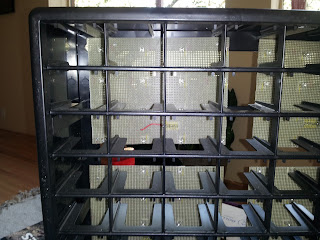
For mounting the board to the drawer holder I just made sure to line them up a bit and drilled a hole in the back. Then I used a couple of regular screws and a screw driver and fixed them to the back.


Painting the drawers

Probably the longest and most arduous task in this project. To assist in the process I started out using these pieces of cardboard, but that was too slow. I ended up just using masking tape and spending a few hours taping up all the drawers. 64 drawers later I had them all painted. Then it was time to do it again!


LED Drivers and whatnot

As discussed previously the LEDs are driven using the TLC5940. My prototype uses 4 of them, one for each board, and an arduino to control them. Most of the software was already written so I designed a PCB and sent it out to the board house.


Software

Once all of the wires were soldered, and the boards populated I went about mapping the LEDs in the Arduino. With a properly mapped LED matrix I was able to start working on the screensaver. One really neat thing about this box system is that it's also great for parties.
I wanted to have the drawers light up along with music from my computer. Being that I like to do things the hard way I decided that it would be awesome to have the computer stream the results of a Fourier transform done in soft real-time. After searching around on the internet for a while I found a visualizer that I could easily hack to suit my needs. 
Impulse is a simple music visualizer for Ubuntu that looks good by itself. I liked it because it was already set up to interface with Pulseaudio. Pulseaudio is an audio software layer in Ubuntu, which has the nice feature of automatically creating a soft channel monitor for every output stream it handles. This is the software output monitor that Impulse uses to pass the audio stream to its FFT. From there it was a simple matter of importing impulse, calling the function, and massaging the output into my array -> serial protocol -> serial com link to the arduino(child's play in python).
Once I had the array in the arduino (the array is basically 8 numbers that represent the energy in each frequency band) it was straightforward to control the LEDs.

One issue that I had/have was timeout. Sometimes the serial link will have too much information passed down it. One symptom was that the device would simply quit working. To fix this I increased the baud rate, and turned on the watchdog feature for the arduino. Now if the arduino hangs because of serial issues, the watchdog will notice and restart the arduino. Here's more info on the watchdog features of the arduino: Arduino Watchdog.

I also had to do some tweaking to have the equalizer be more 'active'. Here's a video of what the system behaved like before the tweaking: pre-tweak.

After working with it a bit, this is what I have...


So what's next?

I have some time tonight. With the Maker Faire coming up on Sunday I am reminded that I have a bunch of pretty cool ideas backed up right now because I haven't finished this thing. Motivation is at an all time high, so I think I'll try and ride the wave all the way back into shore. First thing is first. I will need to finish development of my parts database. I want to have a good interface that will allow me to quickly add parts, reorganize the drawers, keep track of quantity, etc... I consider this step done when I have the database somewhat populated, I can complete searches using simple phrases like "1.uF," and the result will be returned via a lit up drawer.

After that is completed (I think about a week or so), I want to start making my android app. The android app is where I'll get voice search capabilities from. 

As a final stroke I will also include a feature that will allow a user to build a BoM and have the system automatically light up drawers so that parts can be retrieved all at once. Additionally this thing will alert you when you run low on a part so you'll know to buy more.